The Secrets to Reed Adjustment – Unlocked!
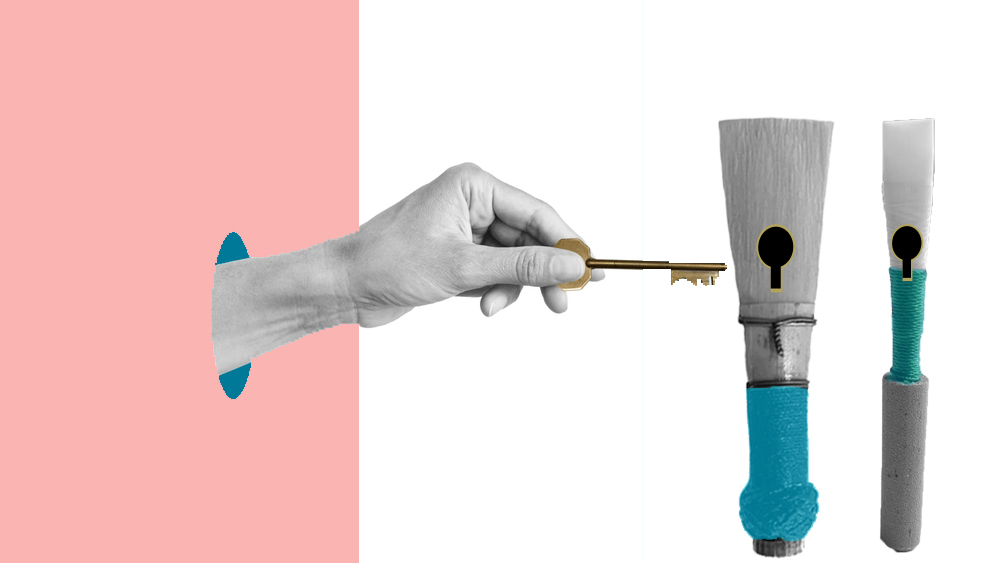
A practical guide for double reed players contemplating reed adjustment
Learning how to adjust your bassoon or oboe reeds is an essential skill.
Like a car owner learning to undertake some basic car maintenance, such as replacing wiper blades, or changing a tyre! Some basic knowhow will enhance your playing experience. And it’s never too early (or too late) to start!
The good news is that, when you can adjust your reeds (even to a basic level) you will save money, you’ll have more freedom and more confidence in your ability as a musician.
This article covers the basic resources you need to adjust reeds, from the aims of reed adjustment to the tools needed. This is followed by a flowchart which lists reed problems and remedy options. You can use this flowchart along with our companion article for specific information on techniques for each of the adjustment ideas.
Why does the double reed need to be adjusted?
Reeds are made of the dried stems of a plant. These dried stems are called cane, which looks similar to bamboo. The reed maker changes the shape of the raw cane into the shape of a delicate mouthpiece for a double reed player.
Understandably the plant fibres in the cane experience stress in taking on their new reed-shaped form. Initially the cane is resistant to the new shape. This is why reeds need playing-in when they are new, and also why they need adjusting to help them play in a satisfactory manner.
The plant fibres in the cane are also susceptible to moving out-of-shape during their life as a double reed. Subtle changes in reed shape can affect the musical outcomes. This is why, during the life of one reed, double-reed players will make several adjustments. And it’s also why double-reed players need two essential tools, called a mandrel and plaque. The mandrel and plaque protect the shape of the reed while making adjustments. But more about these tools later….
Therefore, as a double reed player, your musical journey will inevitably include learning at least the basics of reed adjustment! Sorry if you were trying to avoid this….!
What is the aim of reed adjustment?
The aim of reed adjustment may differ from player to player, and it will differ from reed to reed!
There is a world of reed tweaking to discover and reed problems to solve. Your knowledge and confidence will evolve as you go on this discovery.
The key is to get started; and once you have some basic equipment and the basic framework, there is nothing holding you back from giving reed adjustment a try!
What do you need to get started in reed adjusting? – The Basic Framework
The following diagram shows a mind map for the components of reed adjustment.
The components of reed adjustment are: Equipment, Awareness, Teaching (coaching), Experimentation, Results and Resources.
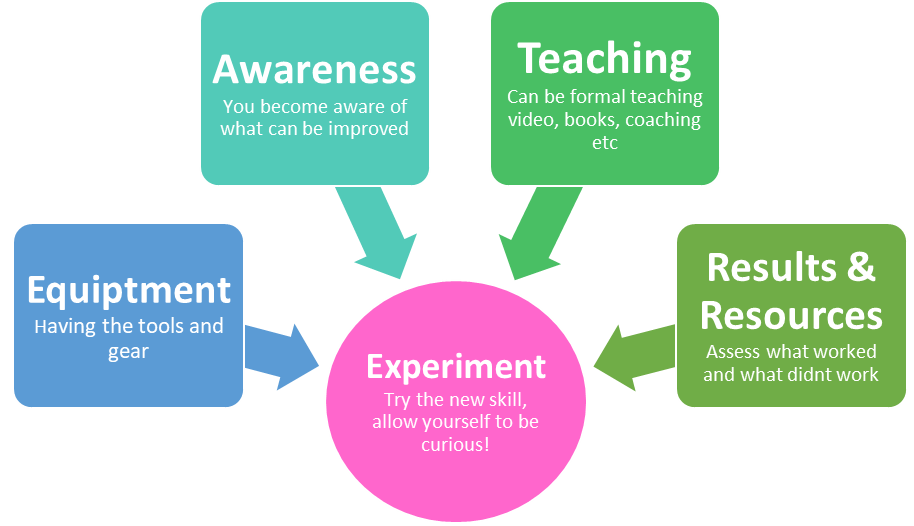
Equipment is having the tools and gear to make reed adjustments!
Initially only a small number of tools are required to make most of the changes you’ll need. If you don’t have access to equipment yet, then now is the time to start collecting!
Having tools is a source of musical pride and a symbol of skill and attainment. Once you become comfortable with reed adjustment, the small investment in the tools will pay itself back in ease of playing and the joy of making music!
Awareness. Awareness is becoming conscious of a challenge, issue or problem relating to the reed.
It is not unusual to feel that the reed is in control of your playing! If you have thoughts like: “I have to really lip-up for a certain note and even then it sounds funny” or “This reed is hard, I feel tired playing it”, then you have started to become aware that your reed could be improved. Learning to adjust your reeds gives you some control over the needs of your reed and its varied moods.
Over time, you’ll become aware of what your reed needs. Like a golf caddy who assesses wind speed and chooses the best golf club, you’ll become adept at understanding the environmental factors on any day and how best to manage your reeds in light of these conditions.
Teaching – Your teacher is an important resource through all these steps. Teaching can come from a range of sources. It might be a formal music teacher, a coach or musical colleague, an app, video channel, social media posts and/or books. Teachers help you gather the equipment you need, or loan you theirs! They help you become aware of the world of reed adjustment and guide you to develop and refine your skills. Ask your teacher to help you identify your goals and aims for reed adjusting.
Experimentation. Experimenting with reed adjustment is an important step. An open and curious mindset is helpful at this stage. Ask yourself “What will happen if I do this?” Make an adjustment, then assess the results. Undertake the adjustment again, or reverse the adjustment, and try something else. Each experiment will give you confidence in your ability to achieve a new reed adjusting skill.
Results and Resources – Use the resources available to assess the results of your efforts.
If you wish to improve the tuning on your instrument, then you’ll learn a number of ways to adjust your reed to attain better tuning. To measure your results, you will check your intonation. Resources like a tuner, teacher or technical guide will give you feedback on your progress.
Become an EATER!
This acronym for this framework spells EATER! So you can EAT up the process! Are you hungry? Then it’s time to start!
The Three Main Categories of Reed Problems
Broadly, there are three main categories of problems a reed player will seek to solve –
- Basic – How to get the reed to fit your instrument, vibrate and make the right sound
- Environmental – How to get the reed to work best in the environment given the temperature, weather and special qualities of the day / room.
- Tuning/Tone and Flexibility – How to get the reed to do what you want it to do to express the music. This includes dynamics and articulation.
Hopefully reading this you are excited at the elements of your playing that may be within your control to adjust! At this stage, you can take a moment to consider what is missing from your reeds / playing. Think about what you would like to achieve. And keep these aims in mind when you approach the next stages.
The Reed Adjustment Framework
Now that you have some awareness and have taken a moment to understand what you are aiming to do with your reed or reeds, here is a summary of the approach you can take and resources to help you.
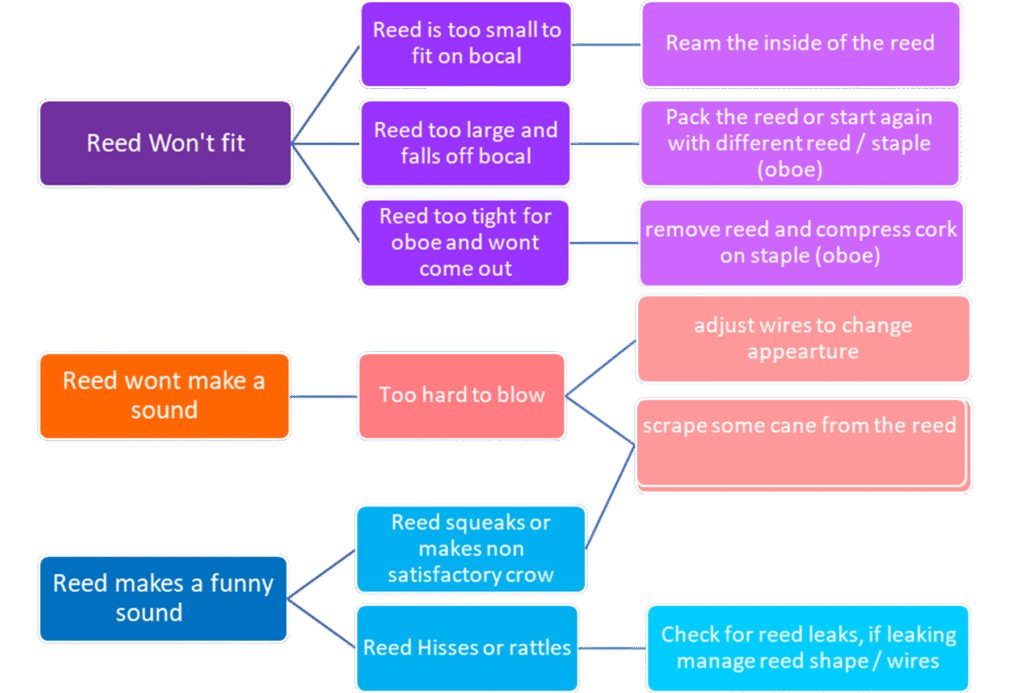
Basic Reed Problems
A basic reed problem is where the reed simply doesn’t function. Basic Reed problems can be easy to remedy in most situations. See Figure 1. Basic Reed Issue Problem Solving Flowchart
Figure 1. BASIC REED ISSUE PROBLEM SOLVING FLOWCHART
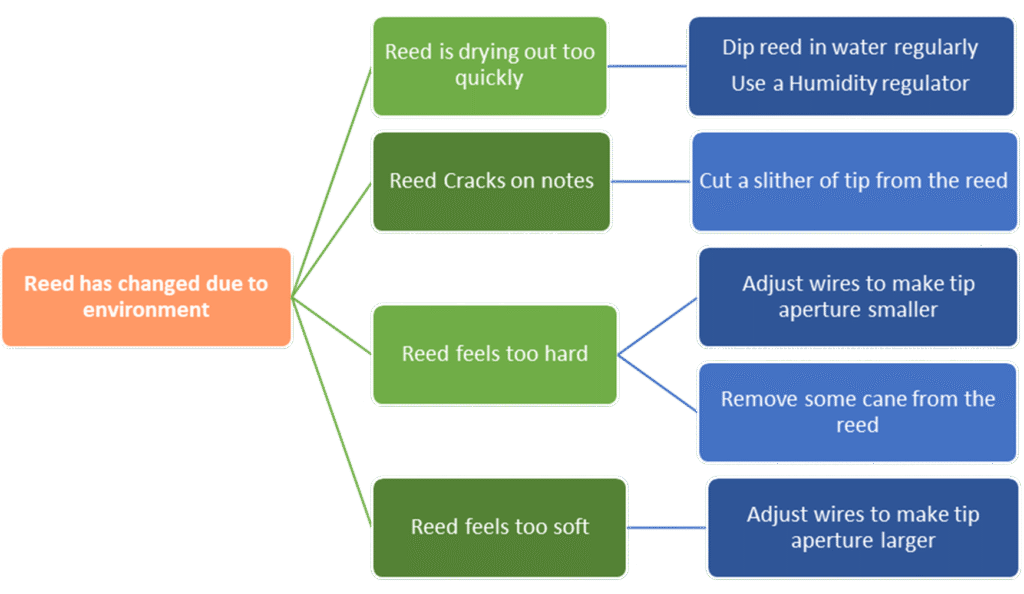
Enviromental Reed Problems
The macro environment (eg. weather /climate) and the micro environment (the air-conditioning or heating in the room) interact to alter the reed, impacting on the way it performs. See Figure 2, Environmental Reed Issue Problem Solving Flowchart
Figure 2. ENVIRONMENTAL REED ISSUE PROBLEM SOLVING FLOWCHART
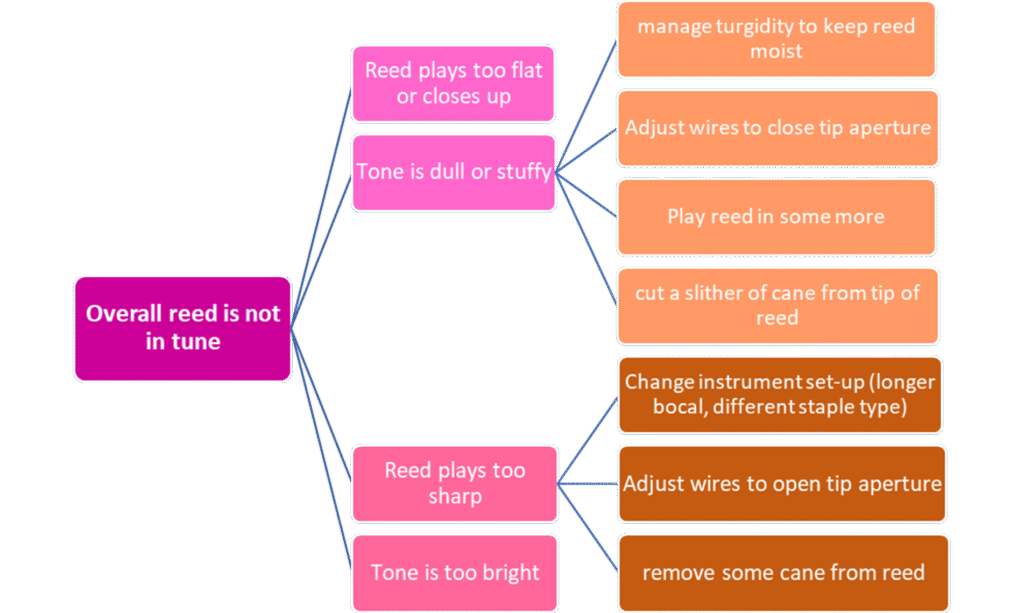
Tuning and Tone Reed Problems
This is where your instrument has a note (or notes) that it doesn’t play inherently in tune or the tonal qualities are unsatisfactory. Or where the tuning is flat or sharp overall on one reed compared to another. Or you are seeking brighter or darker tonal qualities overall.
Figure 3. TUNING AND TONE REED ISSUE PROBLEM SOLVING FLOWCHART
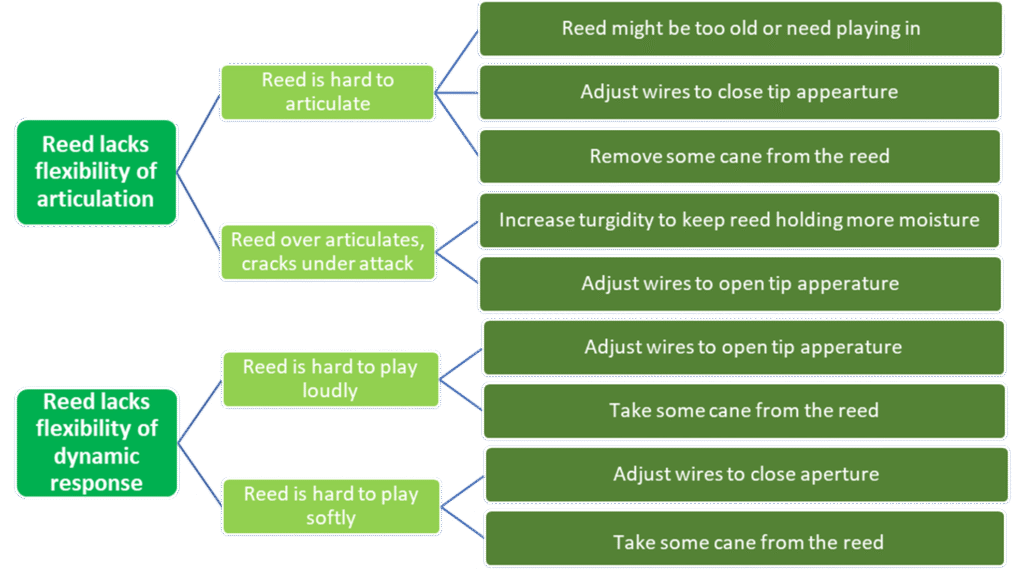
Flexibility Reed Problems Articulation and Dynamics
A reed with flexibility will cope with the artistic demands of a piece of music. Perhaps you are seeking faster articulation, better connection between slurred notes, or greater accuracy to play across the octaves of the instrument at speed.
Figure 4 FLEXIBILITY REED ISSUE PROBLEM SOLVING FLOWCHART
**Turgidity is how much moisture the reed holds.
Remember to soak your reed for 5 minutes in clean water before commencing any reed adjustment activity. This will protect the reed from splitting during the operation! And a soaked (or turgid) reed more accurately reflects the state the reed will be in when you are playing it.
It’s also important to note that double reeds require blowing-in before they reach their optimum playability. Blowing in is a period of time of playing before the reed becomes the best version of itself. We advise blowing your reed in over a period of time before making adjustments, except in the case of basic adjusting. Adjusting the reed early in its life is sub-optimal. The caveat to this is when, despite your best management, you have to use a new / newer reed for an impending concert, recital event or show!
What tools do I need to get started?
The initial investment in reed adjustment tools is less expensive than you might imagine and there is fun in collecting a suite of simple tools to make reed adjustment accessible.
The most important tools to attain are:
A mandrel. The mandrel is a spindle shaped tool made of metal, usually with a wooden handle. The Mandrel holds the shape of the reed and protects its fundamental dimensions while you are working on the blades or wires. This is an essential first tool and is usually used in conjunction with a plaque. Purchase a quality tool made of stainless steel for longevity and perfect hygiene. Ensure you choose a mandrel suitable for your reeds, bassoon or oboe. There are mandrels for Cor Anglais and Contrabassoon as well.
Plaque. The plaque is a small thin object made of steel or plastic, which slides between the blades of the double reed. The role of the plaque, like the mandrel, is to support the shape of the reed and protect the blades while you work on the cane. A plaque ensures you can work safely on the blades and tip of the reed without cracking or breaking the delicate tip ends. There are different sized plaques for your reed, bassoon or oboe
Pliers – a good pair of reed pliers will make working on the wires of your double reed effortless. The best pair of pliers will have the right dimensions to gently squeeze your wrapped wires from the side or the top, without putting strain on your hands or risk damaging the reed. Additionally, the pliers will be able to accurately close onto a single or double wire strand so you can bend, wind or unwind as needed.
Reed pliers are specifically designed to have the correct torque for these gentle tasks. If you can, purchase a specific pair of pliers for reed making (as opposed to using some pliers from the shed or hardware store). The qualities you are looking for are stainless steel for hygiene, the correct dimensions and low torque action – which means they are gentle and will fit the throat of the reed, particularly for Cor Anglais, Bassoon and Contrabassoon. Some pliers also have the added feature of a reed nipper as well. The reed nipping or cutting option allows you to use the pliers to trim the tip of the reed when needed.
Reed File. A reed file is a metal strip with super-fine teeth usually held by a wooden handle. A reed file, otherwise known as a reed rasp is commonly used in place of sandpaper. Although sandpaper can be used to make reed adjustments there are distinct advantages to using a reed file.
Sandpaper leaves residue on the surface of the reed, which clogs the pores of the cane, and leaves the surface of the reed ‘dirty’. A dirty reed surface can collect bacteria, and reduce the vibrancy of the reed, creating a dull tone with less response.
Whereas, the super-fine teeth of the reed file collect the reed shavings within the file rather than leaving this residue on the reed. This creates a quicker adjustment with better results. The reed file is a better ergonomic choice over sandpaper as the length of the file and handle, makes it easier and more accurate to use.
Knife. A reed knife is a blade with a wooden handle, which will last many years and become a beloved staple of your tool kit. Reed knives come in left handed and right handed versions with different types of blades which typically allow for different angles of reed shaping. The knife is a versatile tool, allowing you to trim the tip of the reed, and can be used instead of sandpaper or a reed file for fine, medium and harder reed blade scraping. Your reed knife will come with a sheath to protect the blade when not in use.
Reed Tool kits. These tools are also available to purchase as kits, often presented in beautiful leather or durable canvas pouches. These make an excellent gift for the reed player in your life or for yourself!
Reed Soaking Container. Soaking your reed before adjustment is important, so much so, that its worth investing in a reed soaking container that you can take anywhere!
Conclusion
It is important to have a well serviced musical instrument, in good working order. However, many reed problems can be solved with reed adjustment and even some instrument issues can be mitigated as well!
The best way to reach a stage of confidence and competence is to embark on the process and accept that, like any new skill, there are stages to go through. The first is to start. For most players, Step 1 – Equipment and Step 2 – Awareness is all you need to begin! So now is the time to grab your reed adjusting tools and get started!
*This is a general guide to reed problems. Please enjoy our next article where we expand on the adjustment table in this article with more specific instructions and tips! (Article coming soon!)